
It’s canning season! My backyard garden is starting to overflow with vegetables and I’m starting to see bushels of tomatoes and cucumbers at my farmers market. It’s the most wonderful time of the year!
This blog is part of a series about preserving food so you can eat local all year long. I’ve collected them all into a free course that you can access here. The course includes lessons that explain the basic preservation methods of canning, freezing, and dehydrating, and specific examples of how I use these preserving methods in combination to preserve tomatoes and corn on the cob – two of my favorite foods!
When the most of us think about preserving food, our minds immediately jump to the rows and rows of home-canned goods in our grandparents’ pantry. Canning is a nostalgic process that is an important tool in our modern day preservation toolkit, so it’s a great place to start, but if canning feels overwhelming to you or you’re nervous about it, I recommend skipping ahead to the lesson on freezing. Freezing is an equally good tool that is, in my opinion, underutilized and can sometimes feel a bit more approachable if you’re just starting to think about preserving local food.
Most of the information in this post comes from the makers of Ball and Kerr jars because they’re the experts I’ve relied on for most of my life. I’m going to cover just the basics here. If you’re interested in digging deeper, you can find much more information at https://www.freshpreserving.com/
Getting Started: Explaining the Canning Methods
There are two home canning methods: water bath canning and pressure canning. I’m only going to include water bath canning in this lesson because its the best method for beginners, but if you’re wanting to preserve low-acid foods, including meat, please read learn more about pressure canning.
Water Bath Canning
A lower-temperature canning process, water bath canning is ideal for high-acid foods and recipes that incorporate the correct measure of acid. The combination of time and temperature destroys mold, yeast, and enzymes that cause spoilage while creating a vacuum seal. This process is recommended for produce and recipes including:
- Fruits and fruit juices
- Jams and jellies
- Salsas
- Tomatoes
- Pickles and relishes
- Chutneys, sauces, pie fillings
- Vinegars
- Condiments
Here’s a basic supply list to get you started:
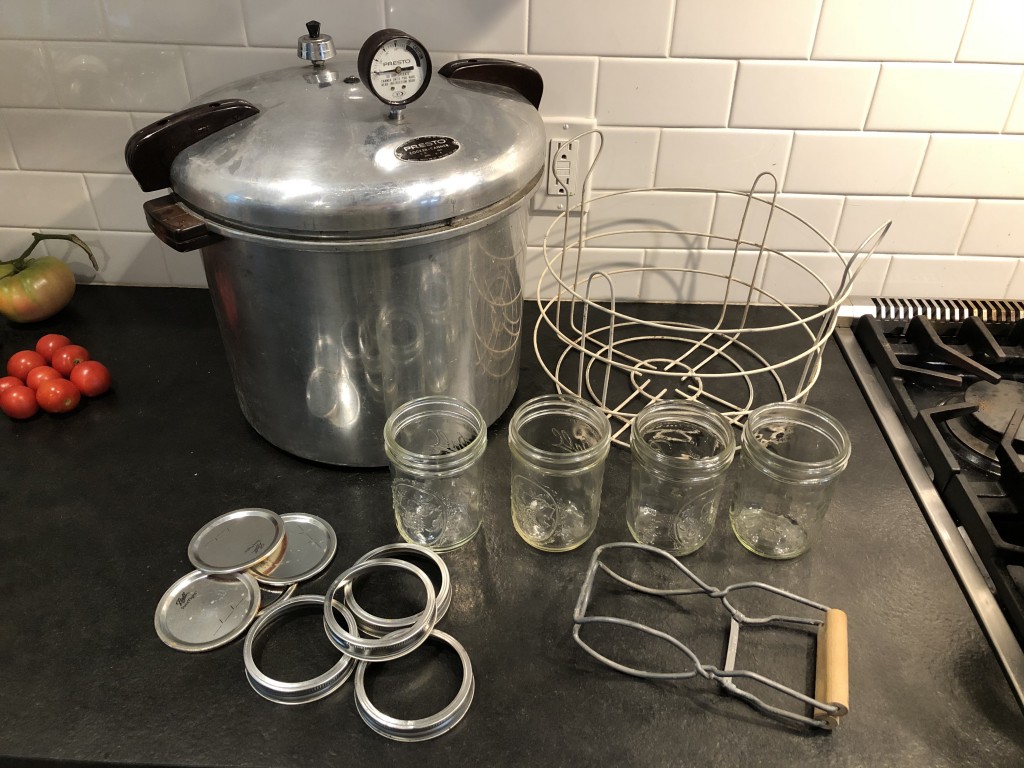
- Boiling water bath canner or a large, deep saucepot with a lid
- If you don’t have a “water bath canner”, don’t worry!
- A large, deep saucepot equipped with a lid and a rack works well. As long as it is large enough to fully immerse the jars in water by 1-2 inches—and allow the water to boil rapidly when covered—the pot is adequate.
- Canning rack
- I recommend using something to keep your jars off the bottom of the pan because they’re likely to break when sitting directly against the hot bottom, so lets get creative if you don’t have a rack at your finger tips
- Ask a friend/neighbor/relative if you can borrow their canning kit or put a call out on your local Buy Nothing group on Facebook (its a group dedicated to passing on or lending items exactly like this).
- Look around your house for a metal rack that might work. For example, my instant pot came with one. A cake cooling rack works well too.
- Make your own by placing a few chopsticks or butter knives in a grid along the bottom of your pot… you can use just about anything as long as it will provide a stable surface to keep your jars slightly elevated, off the bottom of the pot
- Or you can tie together extra bands (the metal part of the jar lid… the part you touch with your hands to tighten) to cover the bottom of the pot.
- You can always buy a rack. I recommend measuring the diameter (thats the distance straight across the top) of your pot and try to find a rack that is just slightly smaller.
- I recommend using something to keep your jars off the bottom of the pan because they’re likely to break when sitting directly against the hot bottom, so lets get creative if you don’t have a rack at your finger tips
- Jar lifter
- This is another tool that is rather important, so you don’t burn your fingers taking jars into and out of the boiling water, so I recommend the same approach to finding one of these as the canning rack. Maybe you can borrow them from the same friend… or make your own with tongs and rubber bands, using this tutorial from the creative folks at kitchn
- Home canning funnel
- This is a really helpful tool and helps keep your working space clean.
- On the other hand, if you’re just getting started and don’t want to buy a lot of new supplies, this is one of the more optional supplies.
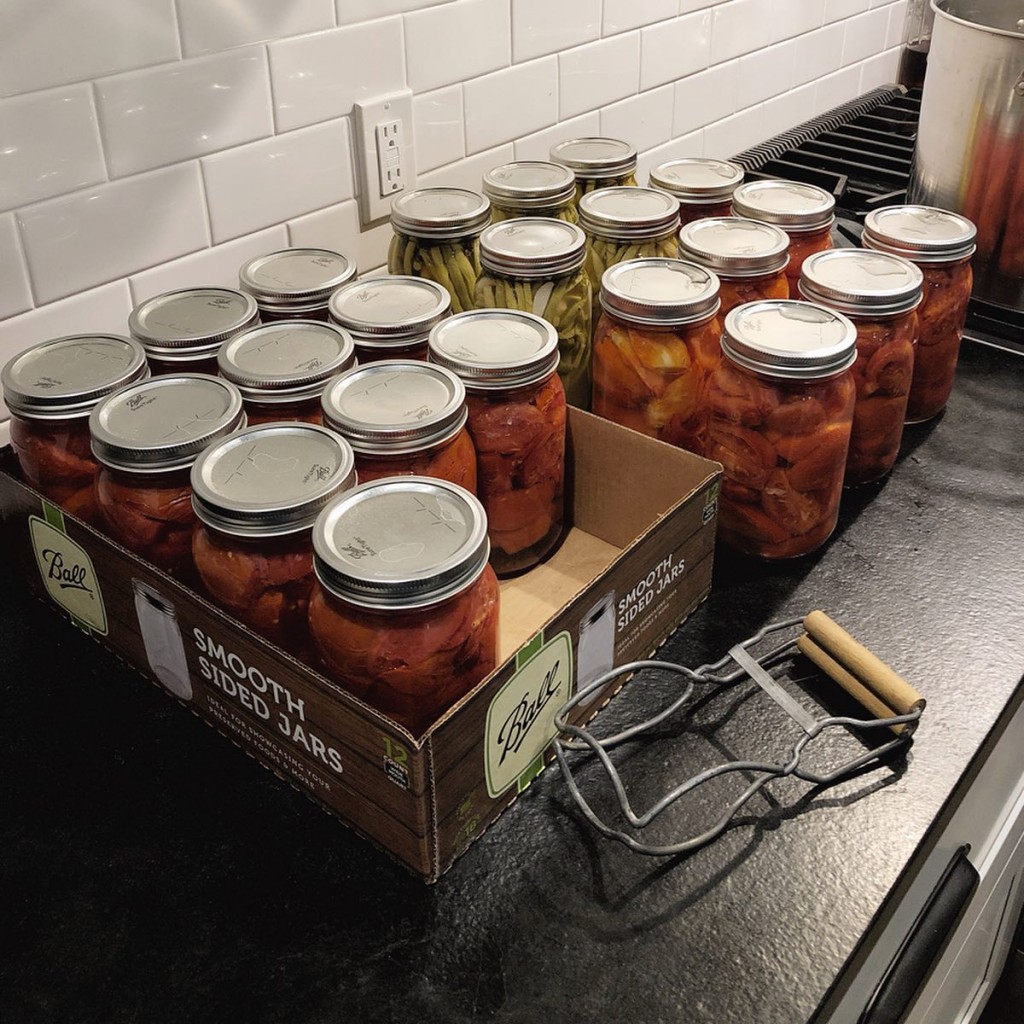
- Glass preserving jars, lids, and bands (the official recommendation is to always start with new lids)
- I recommend using wide mouth jars whenever possible. They’re just so much easier to maneuver food into and out of and they’re better for freezing too, so you can use one jar for all your preserving needs.
- Its also worth thinking a bit about the quantity of a particular vegetable you usually use when grabbing your jars for a project. For example, I can tomatoes, dilly beans, and pickles in quart jars, but prefer pints for jams, jellies, and salsa because I eat those slower and don’t want my hard work to spoil in my fridge after opening.
- Again, if you don’t have a stash of canning jars you can creatively and inexpensively build one using the following sources:
- Buy Nothing groups on Facebook or asking around to see if your friends or family might have extras they’d like to pass on
- Resale shops like Goodwill, Salvation Army, or others that you choose to shop at. I recommend washing all used jars in your dishwasher on hot just to be sure they’re sanitized for your use
- Buying new at your local grocery store or online. I recommend the following (these links are for Amazon because its the easiest, but the Amazon prices are 5x what I pay for these jars locally, so I highly recommend checking your local grocery store first):
- Common kitchen utensils, such as a wooden spoon, ladle, and paring knife
- Quality ingredients (fresh fruits and vegetables)
The Water Bath Canning Process
- Fill water bath canner (or pot) at least half-full with water. Cover and maintain a simmer (180°F) until jars are filled and placed in canner.
- Check jars, lids, and bands for proper functioning. Jars with nicks, cracks, uneven rims, or sharp edges may prevent sealing or cause jar breakage. The underside of lids should not have scratches or uneven or incomplete sealing compound as this may prevent sealing. Bands should fit on jars. Wash all in hot, soapy water and dry well.
- Pre-heat your jars in hot (180°F) water. Keeping jars hot prevents them from breaking when filled with hot food. Leave lids and bands at room temperature for easy handling.
- Prepare the food using a tested high-acid preserving recipe. Ball has lots of online recipes and I’ll share my favorite in the coming lessons.
- Use a Jar Lifter to remove the pre-heated jar.
- Fill jar one at a time with prepared food, leaving headspace recommended in recipe.
- Remove air bubbles, if stated in the recipe, by sliding a rubber spatula between the jar and food to release trapped air. Repeat around jar 2-3 times. For successful sealing, you need to leave the correct amount of space between the food and the rim of the jar.
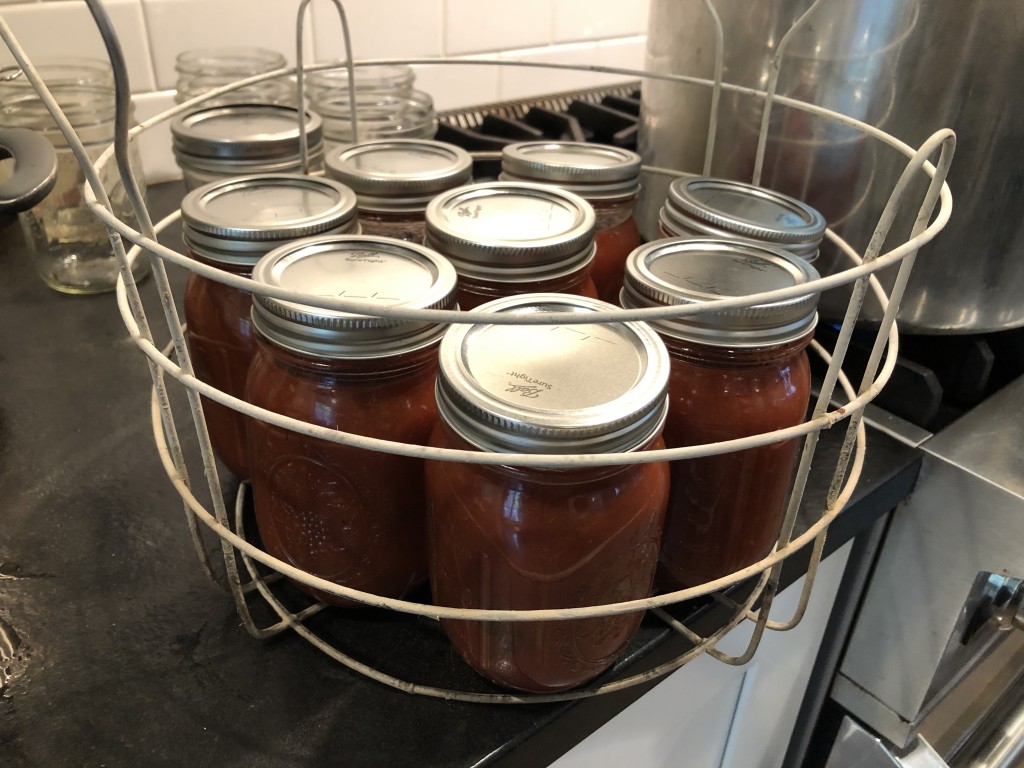
- Wipe the rim and threads of the jar using a clean, damp cloth to remove any food residue. Center lid on the jar, allowing sealing compound to contact the jar rim. Apply band and adjust until fit is fingertip-tight. Place jar in canner. Repeat steps 5 through 7 until all jars are filled. Ensure water covers jars by 1-2 inches.
- Place lid on water bath canner and bring water to a rolling boil. Begin processing time.
- Process in the boiling water for the time indicated in tested preserving recipe. When complete, shut off heat and remove the lid. Allow jars to rest in canner for 5 minutes to be acclimated to the outside temperature.
- Move jars from canner and set upright on a towel. This will prevent jar breakage that can occur from temperature differences. Leave jars undisturbed for 12 to 24 hours. DO NOT retighten bands as this may interfere with the sealing process.
- Inspect lids for seals. There should be no flex when center is pressed. Remove the bands and attempt to lift lids off with your fingertips. Properly sealed lids will remain attached. If a lid fails to seal within 24 hours, immediately refrigerate the product. Clean canning jars and lids, label and store in a cool, dry, dark place for up to for up 18 months.
I’ve found the water canning method to work well for just about anything I want to can, but if you’re wanting to preserve low-acid foods, including meat, please read learn more about pressure canning.
How much should you buy and can?
This is a tricky question, but a really important one to discuss. You’ll probably have to experiment over several years to really answer it well, but to get yourself close right now, I recommend asking yourself the following questions for each fruit or vegetable you want to can:
- How do I plan to cook with this fruit/vegetable?
- How often do we usually eat this dish?
- Do I wish to eat more or less this year?
For example, let’s imagine you’re canning tomatoes for making chili, you normally eat chili once per week, and your recipe calls for two 28-ounce cans of diced, crushed, or whole tomatoes.
In this case, I would recommend you can your tomatoes in quart jars. Quart jars are 32 ounces each, so I would recommend planning on 2 quarts per batch of chili. Since there are 52 weeks in the year, I’m going to guess you eat chili once a week for about half the year… thats 26 times per year… and you need 2 quarts per batch, so I would recommend making about 50 quarts of canned tomatoes.
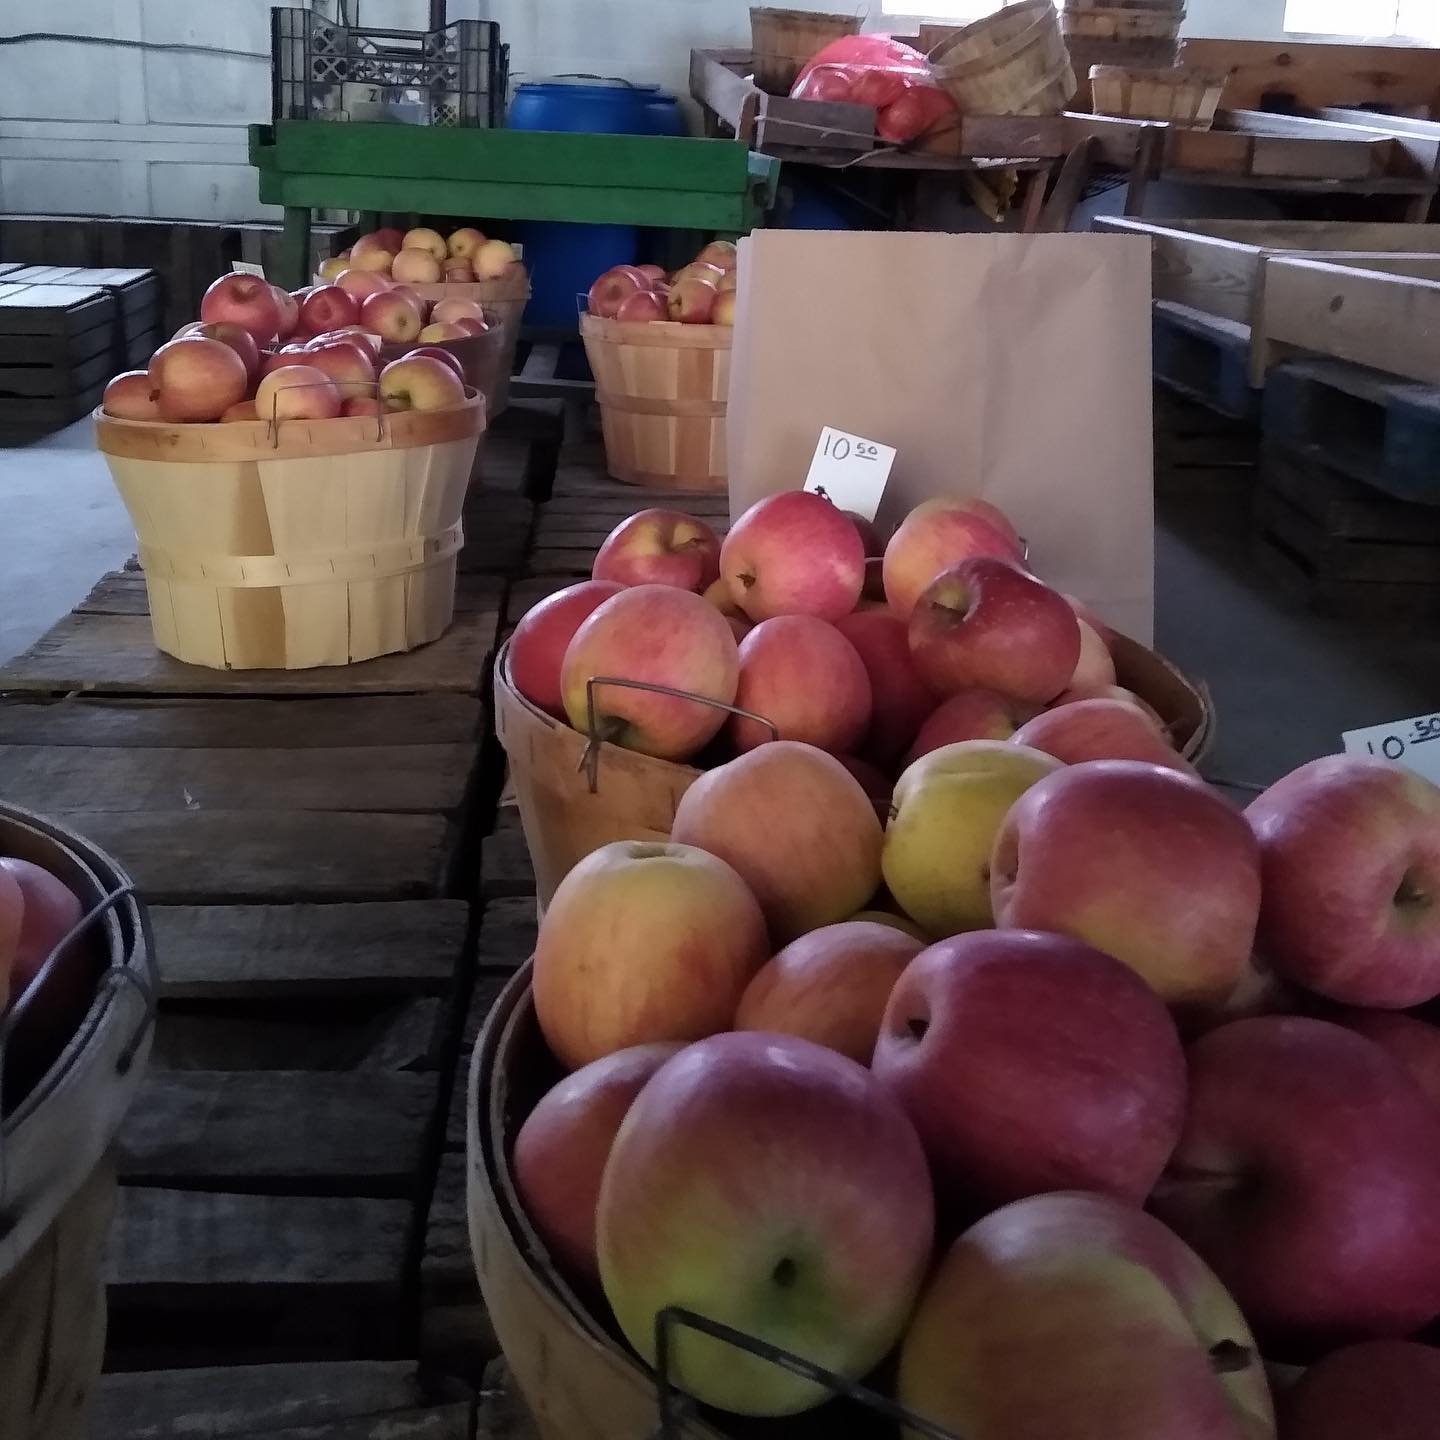
You need about 2.5-3.5 pounds of ripe tomatoes per quart jar. If you buy your tomatoes by the pound, that means you should buy approximately 150 pounds of tomatoes from your farmers market or farm stand.
Most of the time I buy my tomatoes by the bushel, so we need one more conversion. According to this amazing chart (which will help you make this similar calculation for all other fruits and vegetables), one bushel of tomatoes is 53 pounds, so you would need to buy 3 bushels.
Please share your thoughts, questions and experiences using the water bath canning method in the comments!