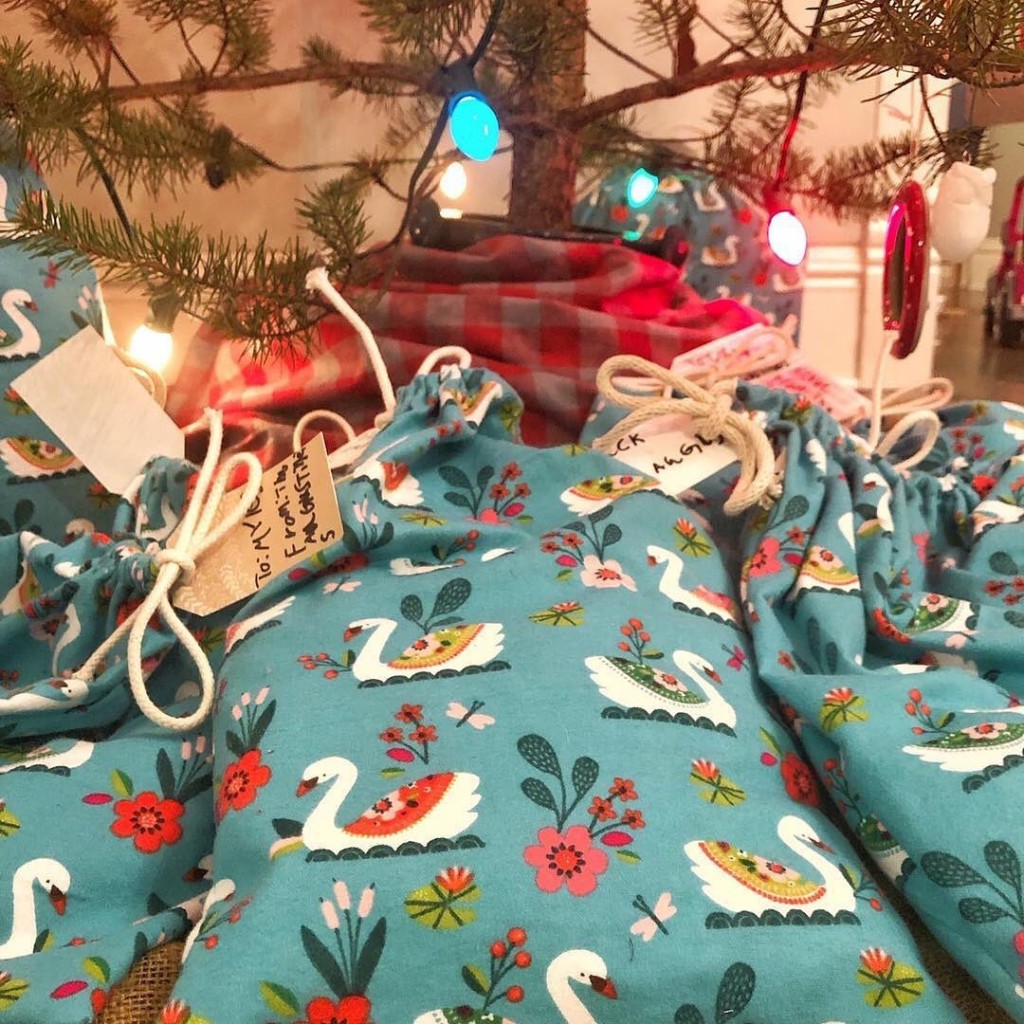
A few years ago, I sewed a bunch of reusable cloth gift bags in cheerful Christmas patterns and they continue to bring me such joy!
I love wrapping presents in these gorgeous bags. I love giving them to people (and am so honored when friends and family want to keep the bag in addition to the gift… in fact, you’ll regularly find me sneaking around and gathering my bags up after gift opening is over at our family gatherings). I love reusing them year after year!
AND they’re super easy to make! I swear, they’re a great project for beginner sewers because it doesn’t matter the size, shape, or even if they’re particularly square. The process is three simple steps: cut, sew, enjoy!
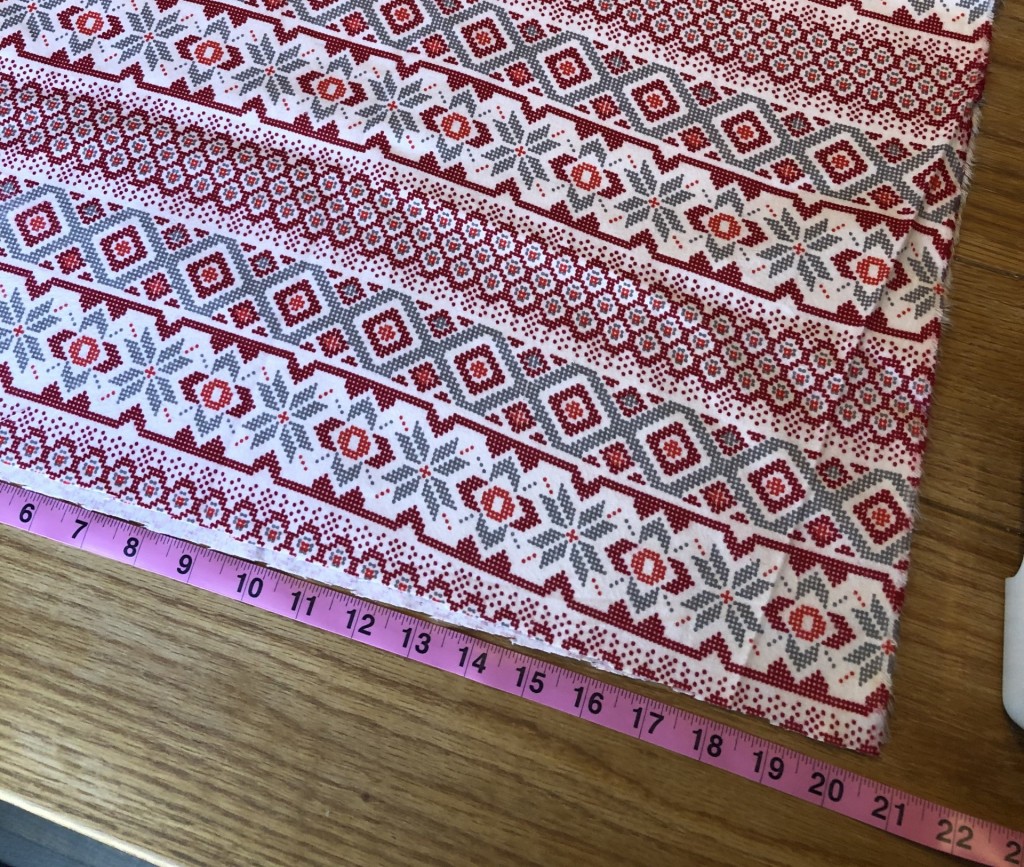
Step 1: Cut your fabric
If the exact size/shape isn’t important to you, I recommend letting your fabric dictate the size.
For example, my fabric is almost 42 inches wide, so I cut it exactly in half and made two 10 inch wide bags. I cut my fabric 15 inches tall and ended up with two 10”x13” gift bags. I love using printed fabric like this because it makes straight cuts easier. I pick a spot in the pattern and cut right along the “line”.
After cutting, my fabric is about 21 inches wide and 15 inches tall.
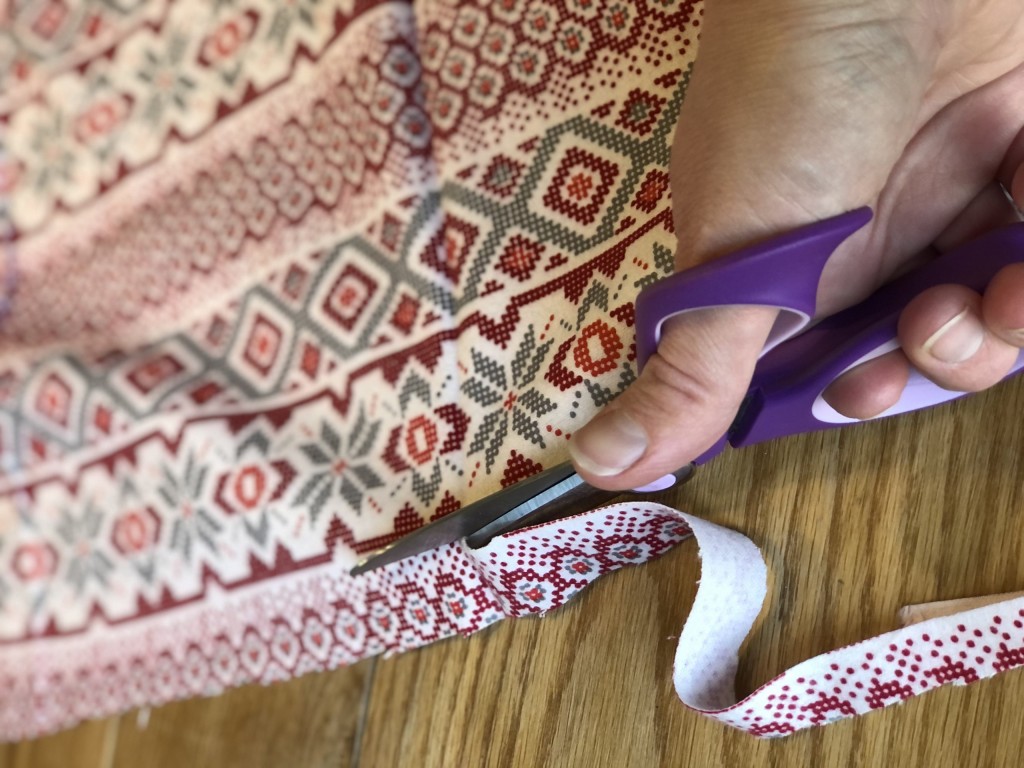
Step 2: Cut your cord
I used 1/4” cotton cord, but feel free to use bigger or smaller. Choose the top of your bag (based on the pattern) and cut your cord at least 8-10 inches longer than the width of your fabric (it will hang out 4-5 inches on either end when you’re done).
My fabric is 21 inches wide, so I cut my cord about 31 inches long.
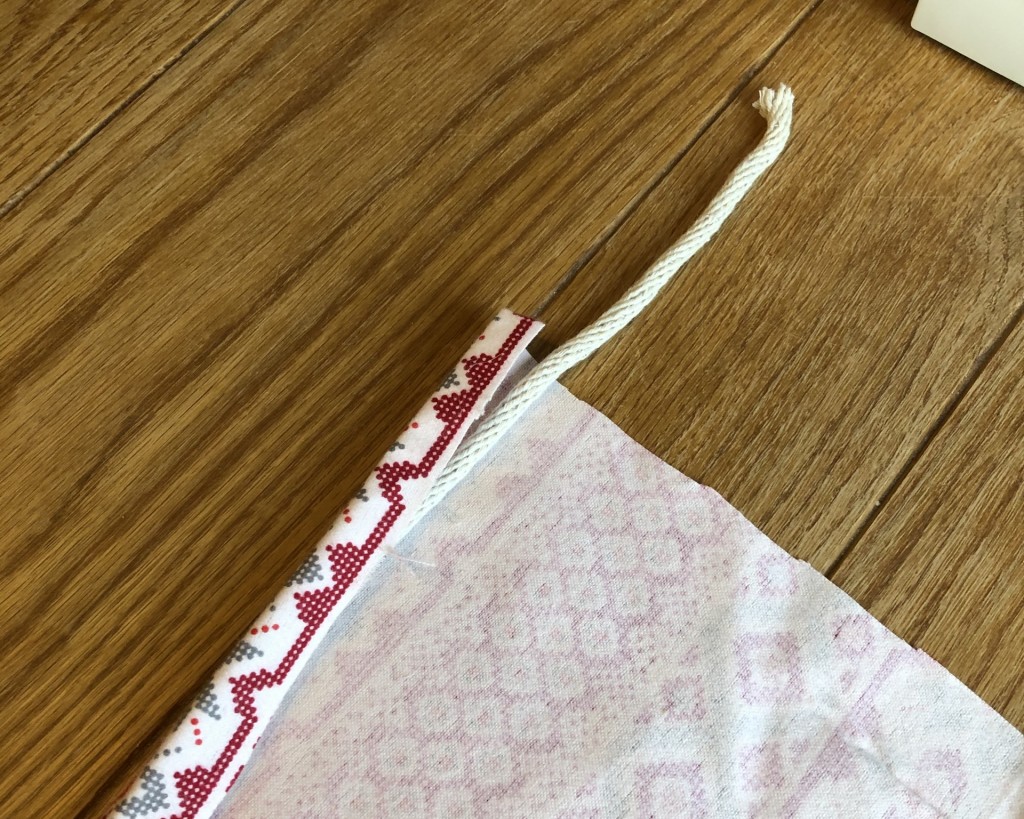
Step 3: Sew your cord into place
Place your fabric with the wrong side up* and the top pointing away from you. Place your cord along the top edge and fold the top of the fabric towards you. You’re going to sew a little pocket for the cord to slide through, so make sure there’s enough fabric that you can run your foot** along the seam without stitching the cord.
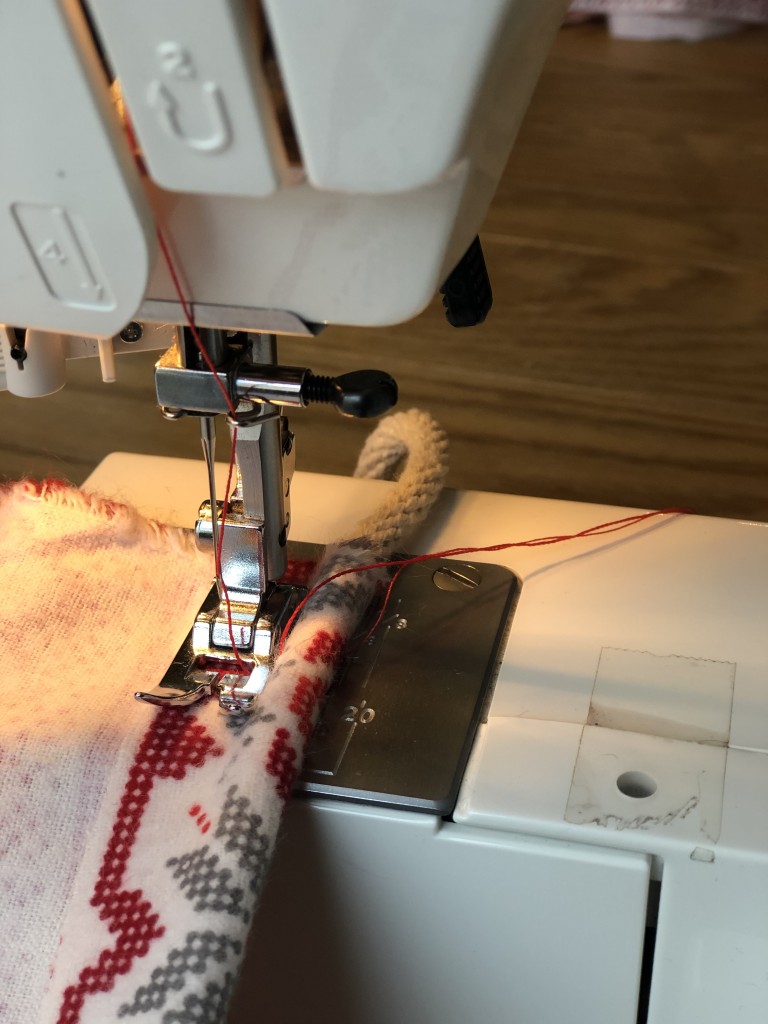
* the “wrong side” is what we call the back of your fabric, the side without the pattern, the side you want on the inside of your bag. ** the “foot” is the mechanism around the needle on your sewing machine as shown in this photo.
Step 4: Sew the other two seams
Keeping the wrong side up, fold your fabric in half. This will be the final shape of your bag, so the cord should be at the top and you should have seams to sew across the bottom and one of the sides. Trim any excess fabric if your edges aren’t lining up.
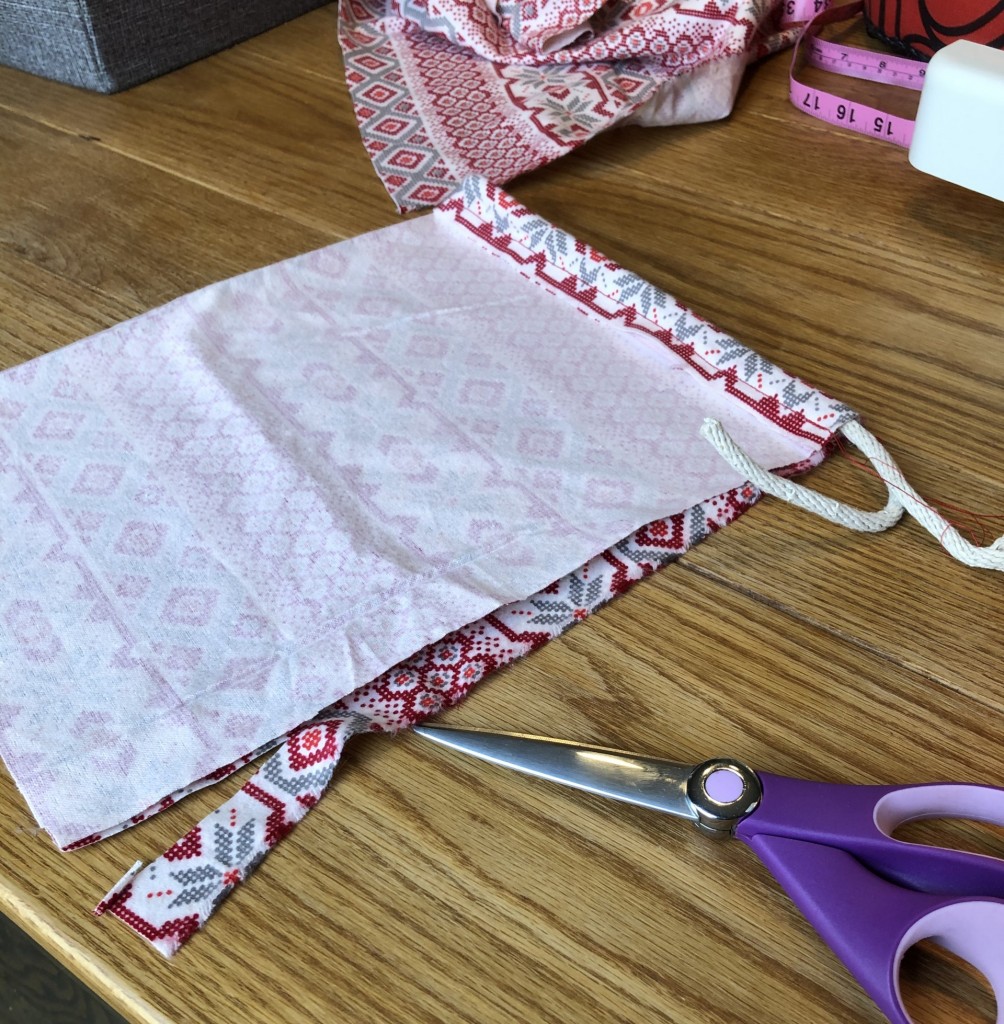
Go ahead and sew these seams. The only tricky part is making sure you don’t sew through the cord/pocket. If you do this, you won’t be able to pull the cord to cinch the bag closed.

Trim extra thread and turn your bag right side out.

Step 5: Tie knots at each end of the cord
This will prevent the cord from accidentally getting pulled into the pocket when someone is opening their gift. Fishing the cord back out is certainly possible, but a royal pain.

You’re done! You can make as many bags as you want, in a myriad of sizes to meet your gift giving needs!
I have about 24 bags total and the “10×13” bag I made today is the “medium” size bag in my collection. I have a bigger size (roughly twice as big) and a smaller size too. Three yards of fabric will yield about 8 medium and 2 large bags. I like to mix and match my colors and patterns, so I’ve purchased different patterns over the years.
Please drop your questions in the comments below. I’m always happy to answer questions!
And comeback to tell me about your experience if you’re making these reusable gift bags for the first time. I can’t wait to hear about your project!
PS. Does this post feel familiar? It should! It was originally posted a couple of years ago. I’ve updated and republished it because it’s one of my favorite posts.
]]>
A few years ago, I bought a bunch of flannel fabric in adorable holiday prints and sewed up a whole pile of reusable gift bags. This year, I’m honored that my tutorial was selected to be included in the winter edition of the Simple Living Collection!
The Simple Living Collection is a digital bundle of resources to help you settle into a slow and intentional life, reconnecting with each other and nature, and embracing this magical wintery time of rest. There are 70+ tutorials, recipes, ebooks, stories and other activities from more than 50 contributors, just like me. It’s on sale for $25 until Monday, December 13th. Available for immediate download, the PDF is yours to keep and revisit year after year for inspiration. If you’re interested, you can buy your copy here!
The Collection is divided into seven different sections to help families build their own slow-living resource binder. Grow, Raise, Create, Nourish, Healthy Home, Wildcraft, and Family. I’m so excited to share a few of my favorites from each section with you!
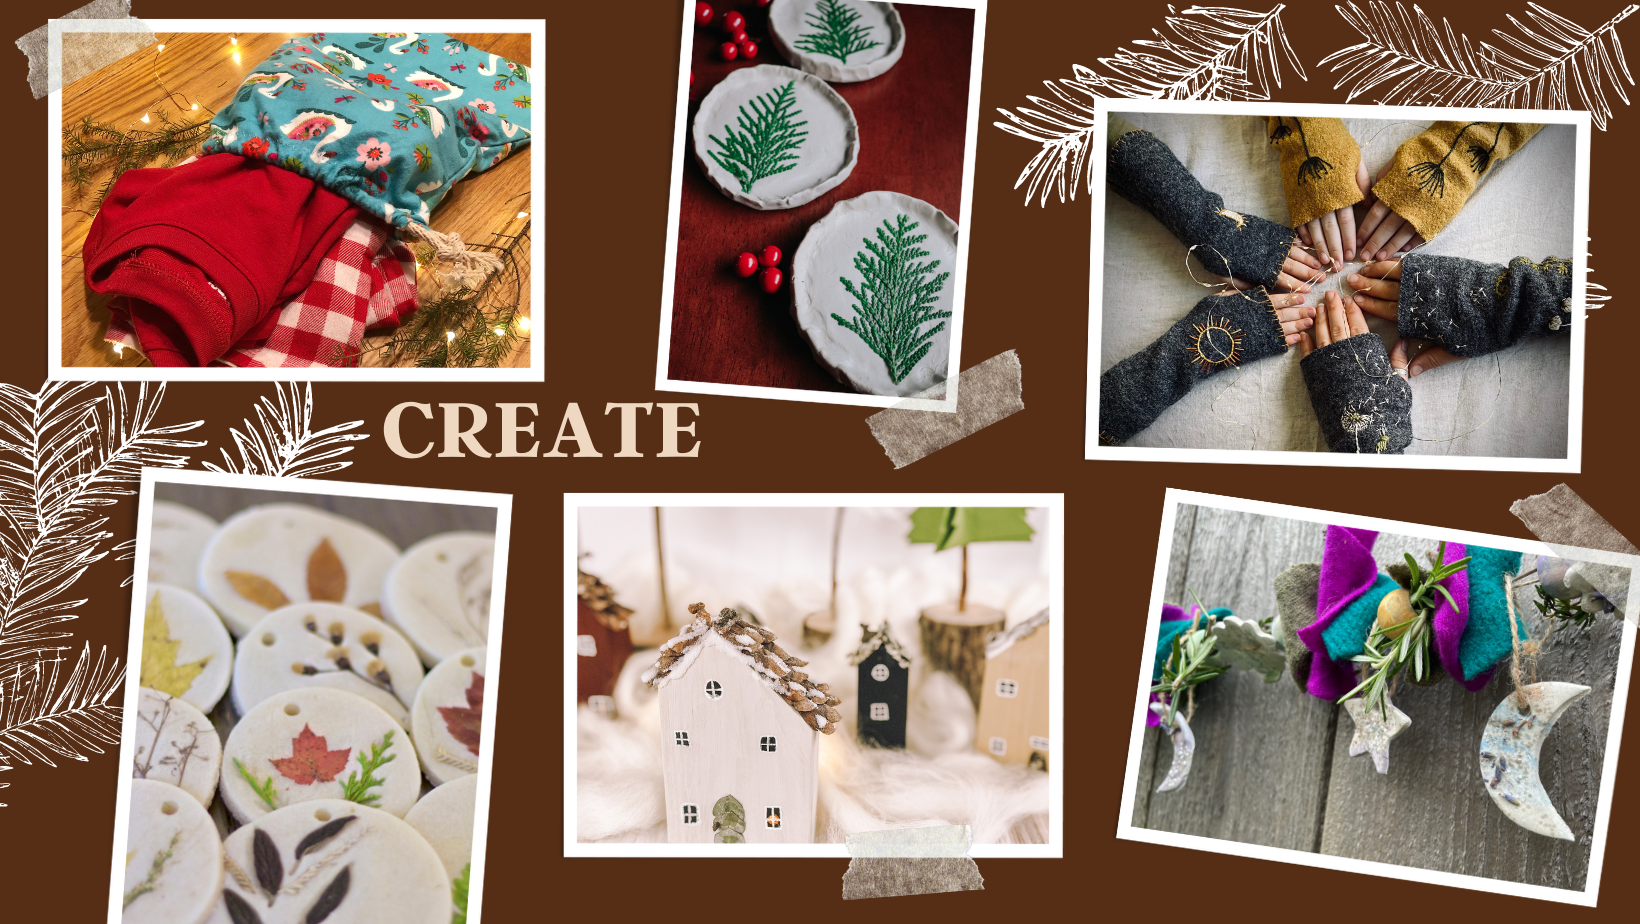
This is my favorite section, full of seasonal and holiday crafts! Simple ones that will make for a joyful hour with the kiddos and longer projects to sink deeply into on a slow and quiet morning by the fire. My favorites include:
- Salt dough ornaments from Heather Turner @thehomespun.mom
- Felted fingerless gloves from Emma-Lisa McGee @ourhomeonthehill
- Evergreen dish tutorial from Tara Rondinelli @littlepinelearners
- Natural winter village from Naomi Noyes @ninos.and.nature
- Winter solstice garland from Angela Ruggles @the.nature.atelier
- and MY reusable gift bags!
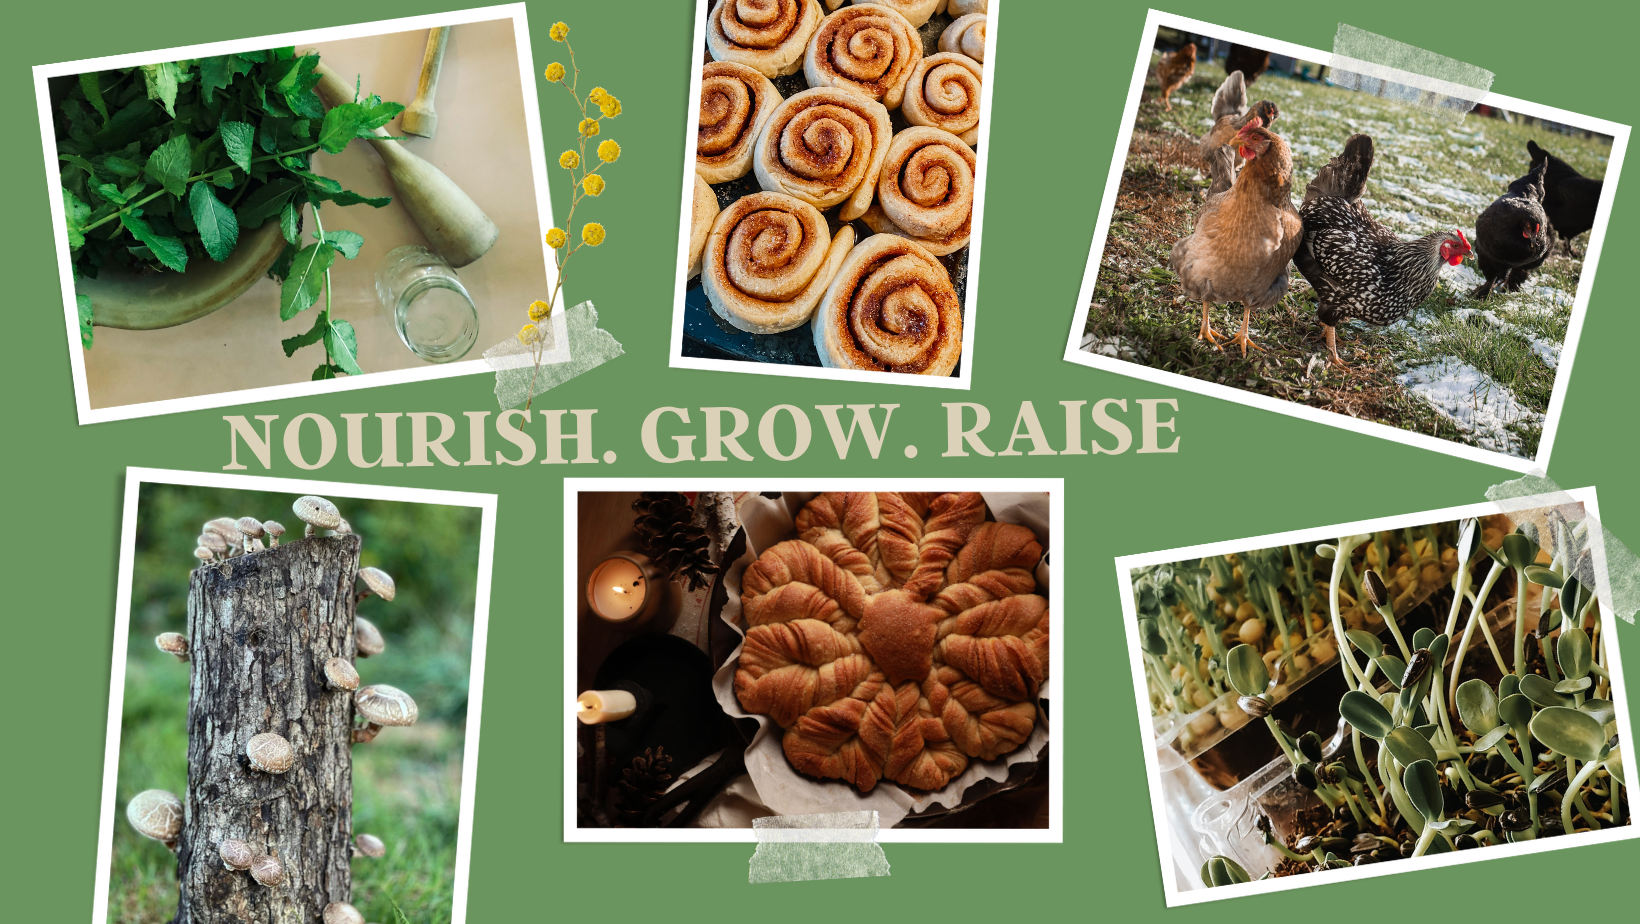
These three sections combine so nicely to help you feed your family with simple healthy food (hello, micro greens! and I think the extracts make perfect gifts) and sweet treats for your holiday special occasions. My favorites include:
- Homemade extracts from Christy Rucker @christyrucker
- Skillet star bread from Cassandra Evans @northwoodsfolk
- Cardamom sourdough cinnamon rolls from Tess Czulinski @naturally_tess_
- Microgreens made easy from Joey Hodlmair @destinationmommy
- Shiitake log tutorial from Roxanne Ahern @happyholistichomestead
- Winter chicken care from Ashley Comer @slowlivinghomestead
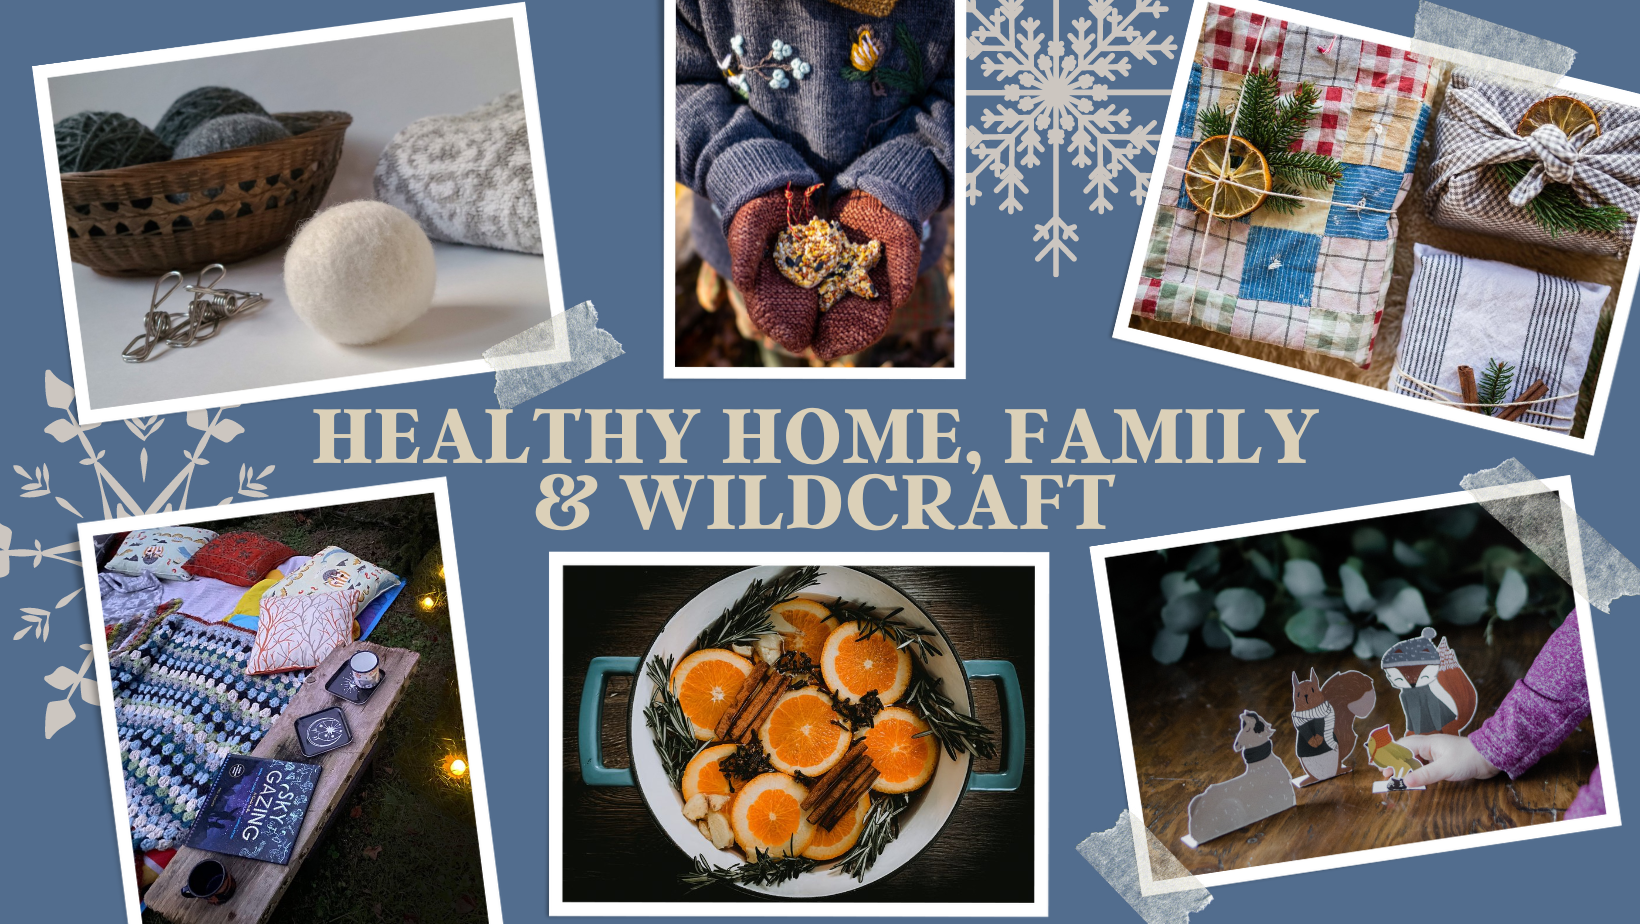
Last, but certainly not least, here are a few of my favorites from the healthy home, family, and wildcraft sections of the Collection. The family section, especially, has lots of fun stories, games, and activities to play with your children, grandchildren, nieces and nephews, or visiting friends with kids during this winter season. There’s plenty here to keep you all entertained!
- Wool dryer balls from Harmonie O’Loughlin @florasfeastbotanicals
- Seasonal simmer pot recipe from Kaila Addis @wildmamarising.ct
- Sustainable gift wrapping (no sewing required!) from Ashley Comer @slowlivinghomestead
- Winter Solstice Guide from Jessie Lehson @wineberryadventurescouts
- Birdseed ornaments from Mari Johnson @bellamartinelli
- Winter puppets from Millie Hernandez @forest.roads
These are only a sampling of the phenomenal work put in by all of the wonderful contributors in this community effort! I’m so excited to be a part of it. The Collection is on sale for $25 until Monday, December 13th and you can get your copy here!
]]>
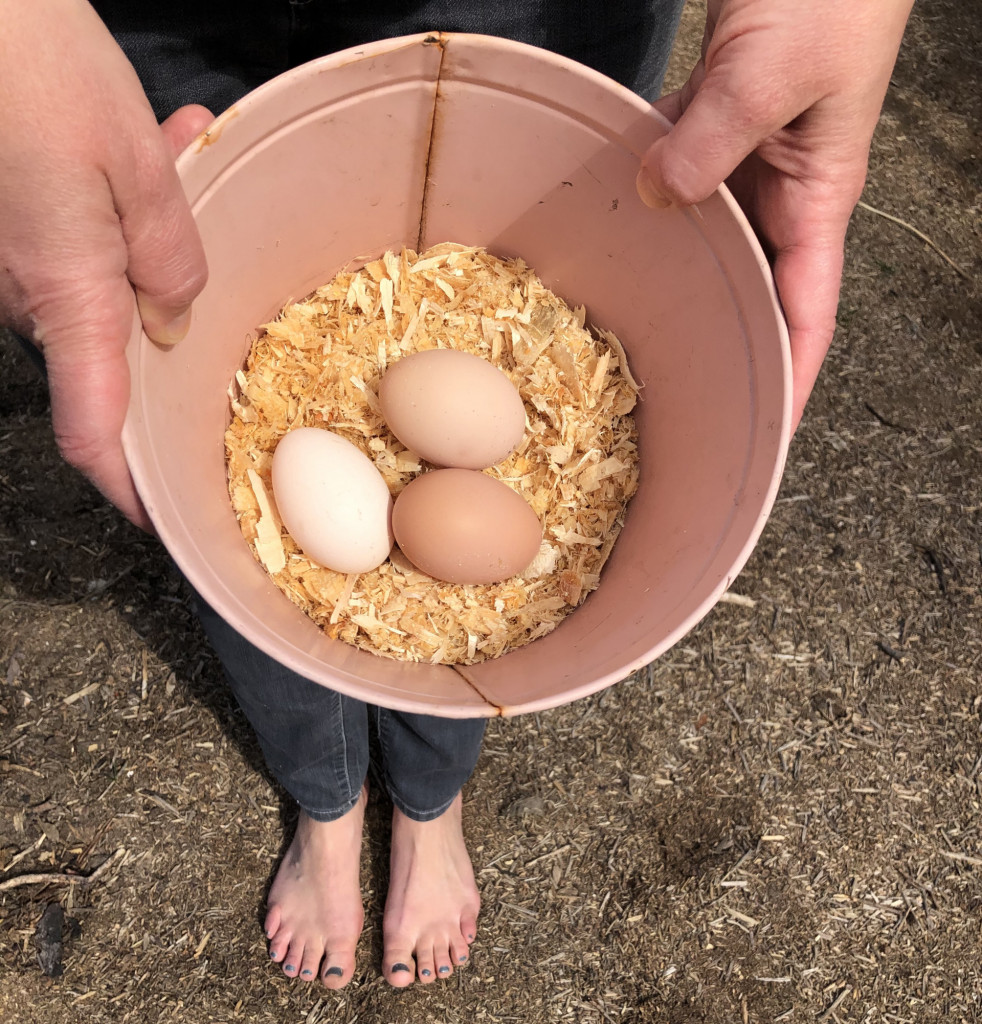
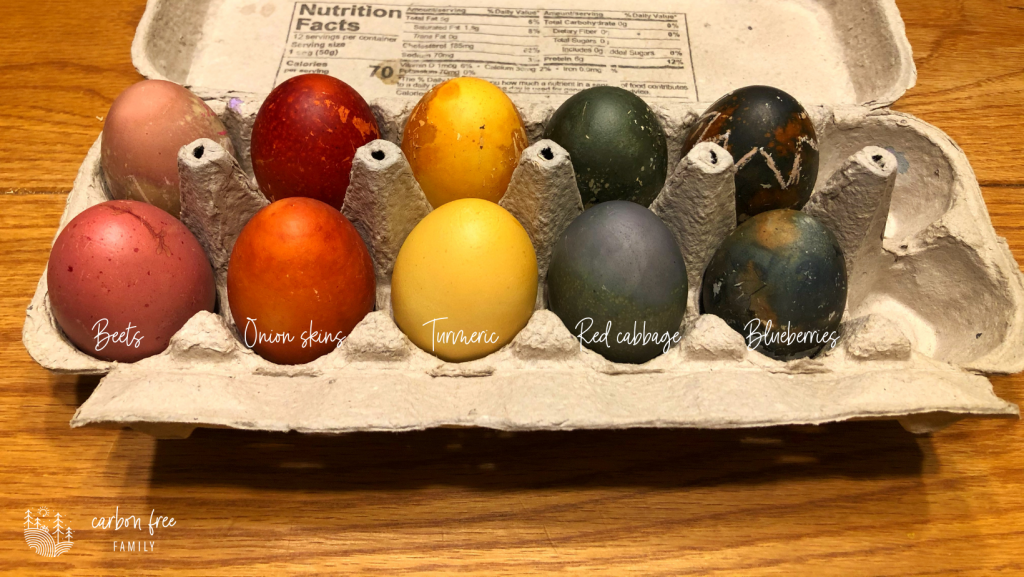
Please don’t worry if you have brown eggs. The eggs from our backyard chickens come in a variety of browns, ranging from almost white to medium brown (as you can see in the photo above), but I’ve colored the more common dark brown eggs before too and they come out just fine, so don’t feel the need to go out a buy white eggs for your Easter dyeing project.
This year I got really excited about making my own natural dyes and am happy to share the recipes with you!
First, you might be asking…”why would you want to make your own Easter egg dyes, Erin? Isn’t that a lot of extra work to get boring, muted colors on your Easter eggs?”
I think it’s wildly important to talk about the why. Why I choose to spend my time and energy on this project vs something else feels like an important conversation to have, especially because slow living means I choose not to do lots of things, so I can do a few things really well.
I chose to explore natural dyes this year for a couple of reasons.
- FUN – This is always number one for me because sustainable living should be fun or it’s not worth doing. We had so much fun making our own dyes. My toddler and I treated it as a giant science experiment, trying to guess what colors we could make from different common foods in/around our home. And the color of the water doesn’t even always align with the color of the egg, so you get to be surprised all over again when you pull these magical eggs out of the dye.
- Health stuff – I generally like to avoid food dyes whenever possible. There are quite a few websites (like this one from the Cleveland Clinic) dedicated to this topic and I’m no where near a medical professional, so I’ll let you do your own research on this.
- Saving money – I didn’t spend a penny this year on our Easter eggs. I know single use dye kits aren’t very expensive (somewhere between $3 and $10, right?), but every dollar counts when you’re trying to make sustainable living available to everyone.
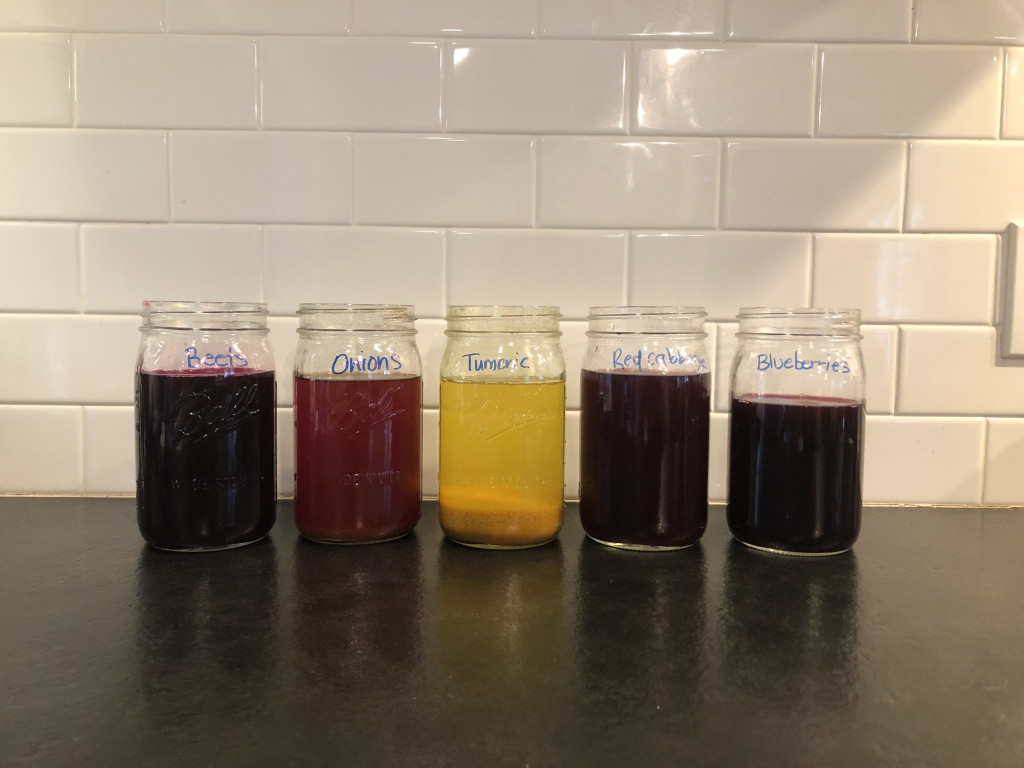
- Waste – I can’t stand the amount of waste in the average Easter egg dyeing kit. Sure, it’s not a lot by volume, but all of it feels unnecessary to me. I did take the time to think about the waste I’m creating when making my natural dyes because minimizing food waste is really important to me. I used the following ingredients in the recipe below and minimized food waste in the following ways:
-
- Beets: After boiling the beets for an hour they were perfectly cooked and edible so I saved them for salads and snacking. I didn’t peel them ahead of time, but I would recommend doing this if you plan to eat them and don’t enjoy eating the skin
- Onion skins: I stole a bunch of onion skins from my freezer stock bag (I save my vegetable scraps and meat bones in a bag in the freezer to make my own stock. Blog post coming soon about this process… stay tuned), but you could easily save your onion skins from cooking for a couple of days or sacrifice an onion or two. I was surprised by the small amount of skins required to make this dye. I used a combination of yellow and red onion skins to make my orange dye.
- Turmeric: this powdered spice was wasted. I couldn’t figure out how to save/use the spice in the end.
- Red cabbage: We happened to have a small red cabbage in our vegetable garden that had overwintered and was no longer edible. I can confirm that cabbage past it’s eating prime works just fine for dyes, but the smell of the cooking almost rotten cabbage isn’t great… it was almost more than my husband, Robbie, could handle!
- Blueberries: I used the last of a box of frozen blueberries from our freezer, so they were small and starting to dry out after spending the whole winter frozen. I composted the blueberries after boiling them for an hour. I bet you could get creative and eat them, maybe as a topping on yogurt or ice cream or in a smoothie. If you try this, please come back and tell me about it!
And finally, here’s the recipe and step-by step tutorial for you to make your own naturally dyed Easter eggs!
Recipe
(makes enough dye to color at least one dozen eggs)
This recipe is adapted from Mommypotamus
Ingredients
Hard boiled eggs
2 cups diced beets (for pink/red dye)
1-2 cups onion skins from red and/or yellow onions (for orange dye)
3 Tablespoons Turmeric (for yellow dye)
2 cups shredded red cabbage (for blue/green dye)
2 cups blueberries (for blue/purple dye)
3-4 cups of water per color
2-3 Tablespoons of vinegar per color
Instructions
- Cut/prep vegetables
- Place them in a pot, cover them with water (3-4 cups per pot/color), and bring to a boil
- Reduce heat and simmer for 10-60 minutes (longer time here creates a darker color)
- Cool completely and transfer to quart jar
- Add 2-3 Tablespoons vinegar per jar (note that 3 Tablespoons + overnight soaking was problematic for me; please see the note below)
- Place hard boiled eggs into the dye for 1 to 12 hours, depending on the desired color
Like any good experiment, we experienced both success and failures! A couple of important things I learned through my experimentation that might be helpful to you:
- Light brown eggs and/or a short time in the dye generally resulted in lighter colored final product (as you can see in the front row of the egg carton photo above)
- Darker brown eggs and/or leaving them in the dye longer generally resulted in darker colored final product (as you can see in the back row of the egg carton photo above)
- I left some of the eggs in the dye overnight and the vinegar started to peel off the outer layer of the eggs shell (you can see this in the back row of the egg carton photo above). If you are planning to leave your eggs in the dye overnight, I recommend using only 2 Tablespoons of vinegar to try to prevent this.
- Also, the natural dye doesn’t appear to be as “sturdy” as commercial dyes. As we handled the finished products, we noticed more and more scrapes and peeling in the dye.
As our first try at naturally dyed Easter eggs… I’m going to call this a wildly successful event. It was the perfect mix of science experiment and craft project, and we had great family moments throughout the process!
I can’t wait to see your naturally dyed eggs! If you try this at home, please come back and tell me about it! Bonus points for photos or tagging @carbonfreefamily on Instagram or Facebook. HAVE FUN!
]]>
But what if gifts is your (or your partner’s) love language? And how do we navigate the challenging world of the school Valentine’s Day party?
For these situations, I can offer you a couple of suggestions and a little tutorial for homemade, low waste Valentines.
Here are a few recommendations for low- or no-waste gifts:
- Consumables. In my world, gifts of food are always welcome. There are lots of ways to give the traditional gifts of chocolate in a less impactful way.
- Consider buying from a local business and try to avoid packaging. Lots of local coffee and candy shops will sell you bulk candy in a paper bag or your own container, instead of the cellophane wrapped heart box that has become the tradition.
- Or consider buying FairTrade Certified chocolate, so you know the food was raised and harvested in an environmentally and socially responsible way.
- If chocolate isn’t your thing, consider gifting another favorite food, like a special fruit, a favorite meal, or dessert. Bonus points if you support a local, small business or buy your food without packaging.
- Plants. If you’re looking for an alternative to cut flowers, consider a potted plant instead. You can choose something that will continue to grow inside you home, improving your general health and air quality, or a type of plant that can be planted outside in your flower garden in the spring. Don’t overlook the fun option of edible plants. Herbs, like rosemary, or dwarf fruit trees, like lemons and limes, make a really fun gift!
- Something really practical. If your partner is the kind of person who really loves tearing open the wrapping paper, opening a box, and discovering the gift inside, consider gifting them something they actually need. One year, Robbie gave me a dozen pairs of my favorite socks. In the middle of winter in Michigan, this is a grand expression of love!
Ok! On to the homemade Valentine’s tutorial!
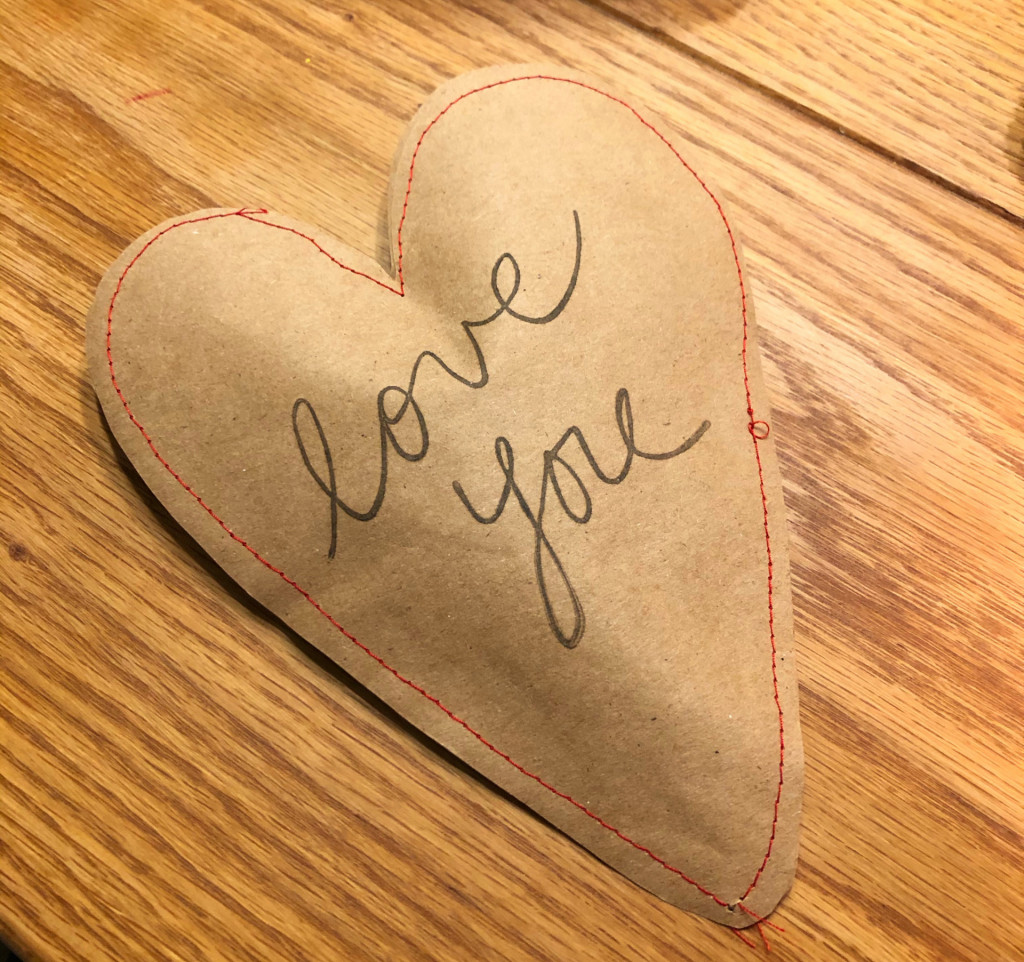
My oldest daughter and I were inspired by beautiful homemade valentines created by @tulips_and_a_toolbox, so we decided to have a try at making our own. I was shocked at how well it worked to sew paper, so I just had to share the details with you! (Yes, you read that right, we sewed these paper Valentines… on my sewing machine!)
If you want to make them exactly like ours, you’ll need the following supplies, but this craft is so flexible that I encourage you to substitute supplies you already have in your home. There’s no need to go our a buy anything special for this!
Recommended Supplies:
- Paper – we used brown craft paper from a big roll. You’ll see in the tutorial that this was less than ideal; flat paper would work slightly better if you have it.
- Stamps + ink – we used this to decorate our valentines; if you don’t have stamps and ink at home or you’re doing this craft with younger kids markers, colored pencils, crayons, stickers, and/or stencils would also work great.
- Scissors
- Sewing machine + thread – you can absolutely sew these by hand (I tried it and it was hard, but doable; although the finished product didn’t look nearly as crisp and professional as the ones I sewed on the machine)
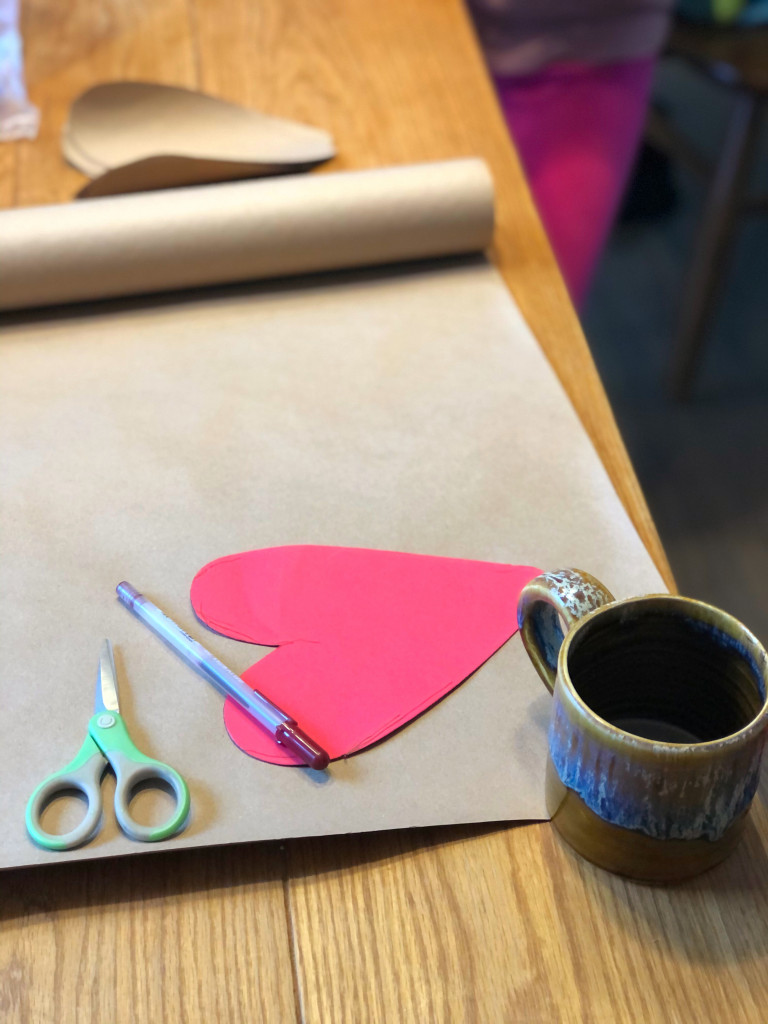
Step 1: Create a template
If you want to make your Valentines shapes uniform and consistent, I recommend creating a template that you can trace over and over again. I cut this heart out on my Cricut, but you could easily draw and cut out a template of any shape/size by hand. If you want to stuff your Valentines with a little gift, be sure to make the shape big enough that you’ll be able to fit the gift inside when you sew the two pieces together.
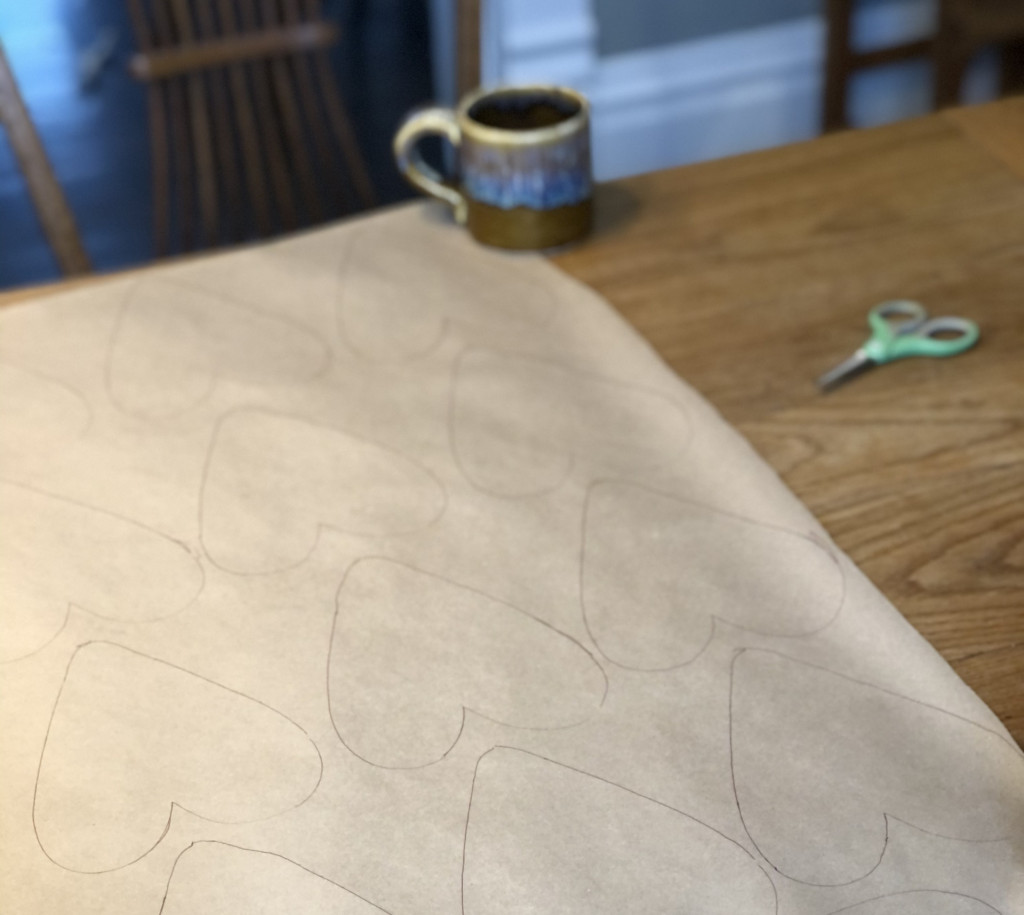
Step 2: Trace your template
Use the template to trace your hearts onto your paper. Remember, you’ll need two paper hearts for each Valentine if you’re planning to sew them together into a cute little pouch.
We used rolled brown paper, which was a little challenging as the paper kept trying to roll back up. As you can see in the photos, I used weights on the corners to hold the paper in place while I was tracing.
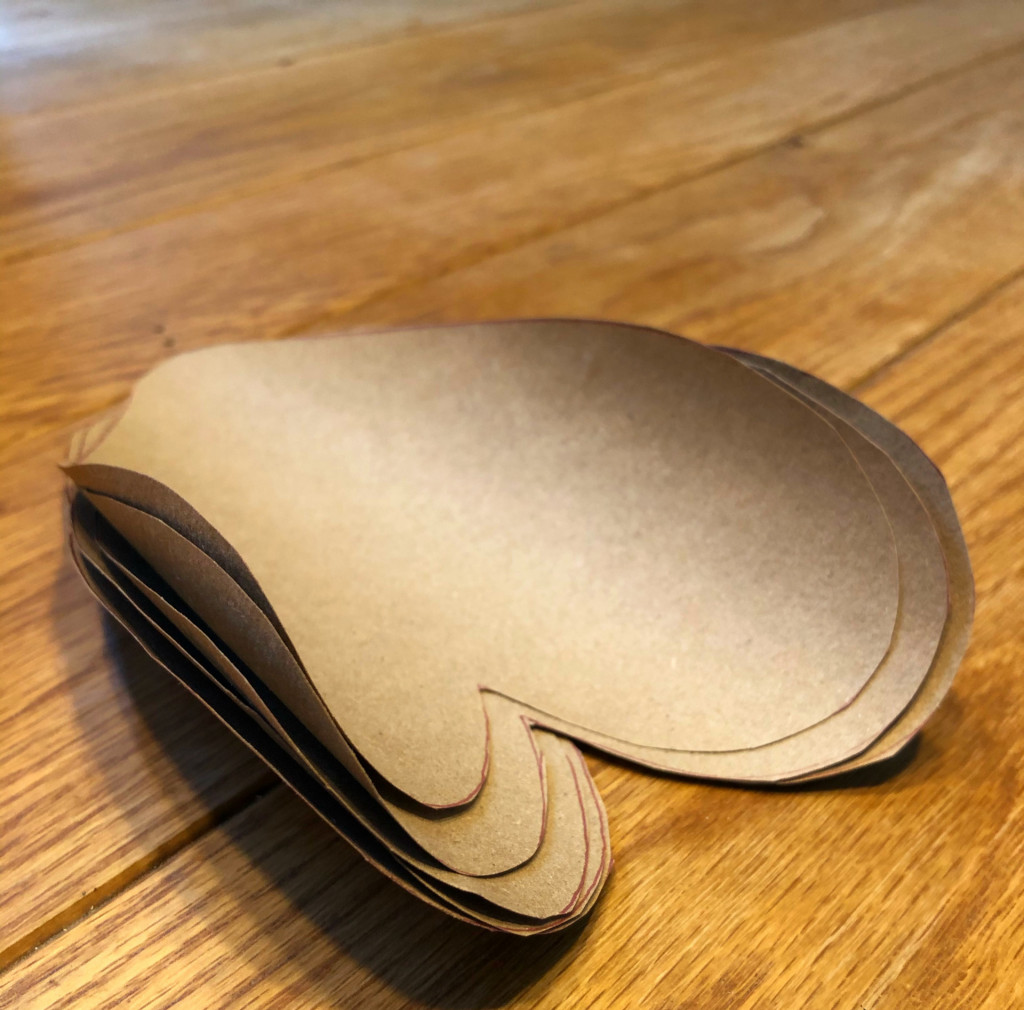
Step 3: Cut out your hearts
Cut out all your hearts at once. Again, mine kept wanting to roll up, so I had to flatten them under a heavy book before moving on to the next step.
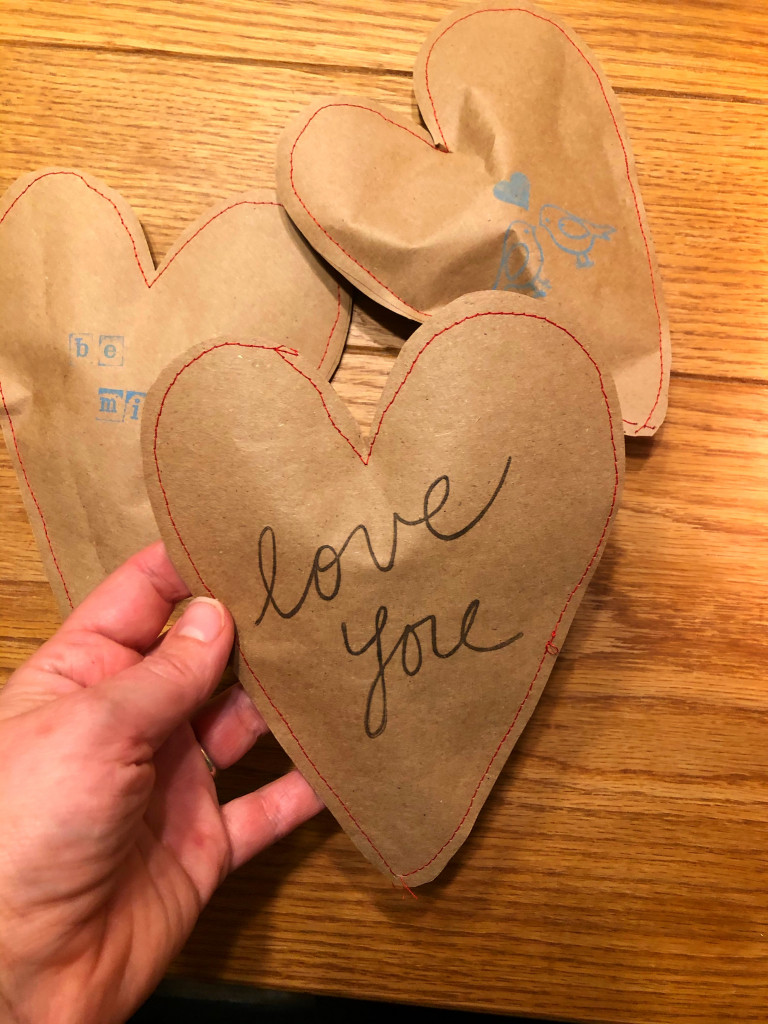
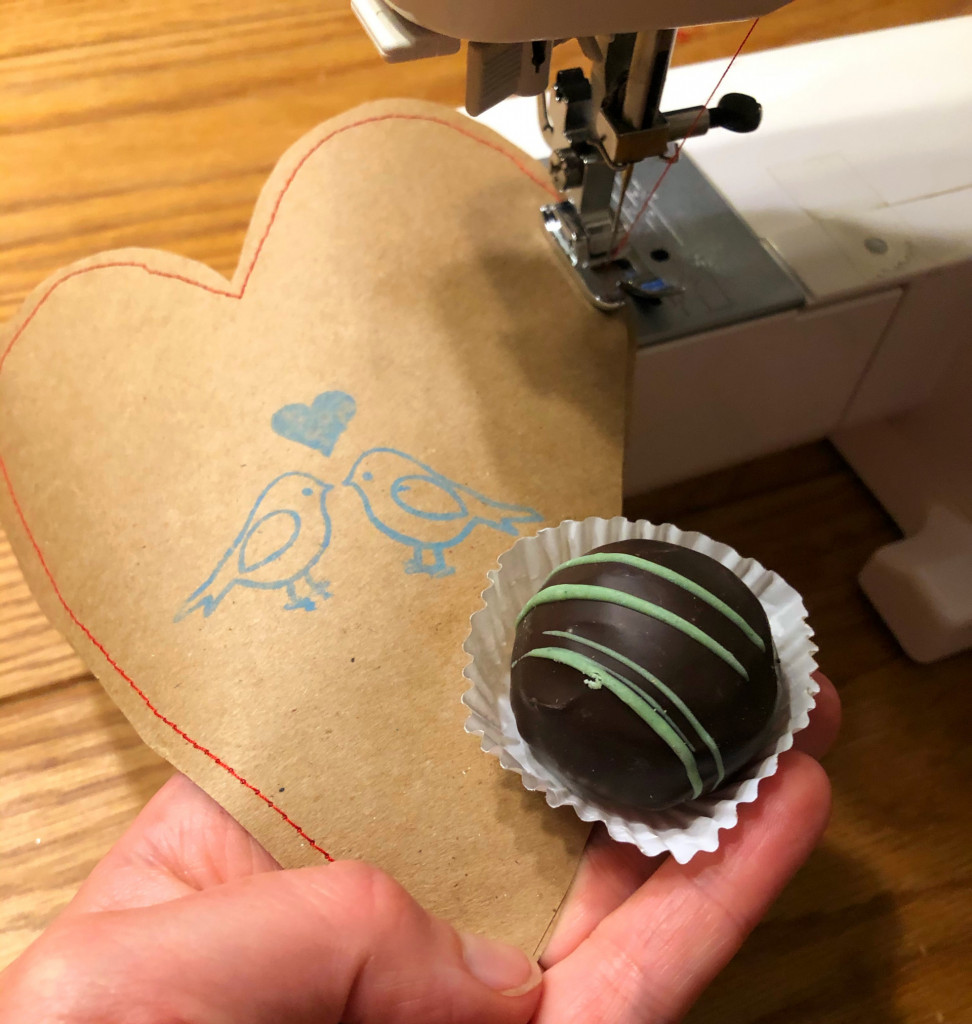
Step 4: Decorate your Valentines
We had a great time using stamps and ink to decorate our Valentines with words and pictures to communicate love and well wishes! We used stamps, but again you could draw free-style or use stencils if you don’t have stamps/ink handy.
Step 5: Stuff and Sew
There are two ways to approach the stuffing/sewing.
If your gift is small enough, like this truffle from my favorite local coffee/candy shop (Sweetland Candies), mints, or those little candy hearts with the cute messages, you can sew the entire way around the edge of your Valentine. I recommend sewing at least half way around, pausing to stick your little gift into the pouch, and then sewing the rest of the way.
Here are a few tips while sewing:
- Match your two pieces of paper, making sure the decorated side(s) are facing out. Hold them together and sew around the entire edge.
- I found that I didn’t need to pin or tape them in place, holding the two pieces together with my left hand while steering with my right seemed to work just fine.
- I also found that it didn’t seem to matter where on the heart I started and ended my sewing.
- If you’re an experienced sewer, have fun with various stitches and edging techniques! I decided I liked the simple look of the plain red stitch on the plain brown paper.
If your gift is bigger, like the fun dip candy my daughter wanted to give her third grade classmates, you can sew most of the way around the edge, leaving the top open.
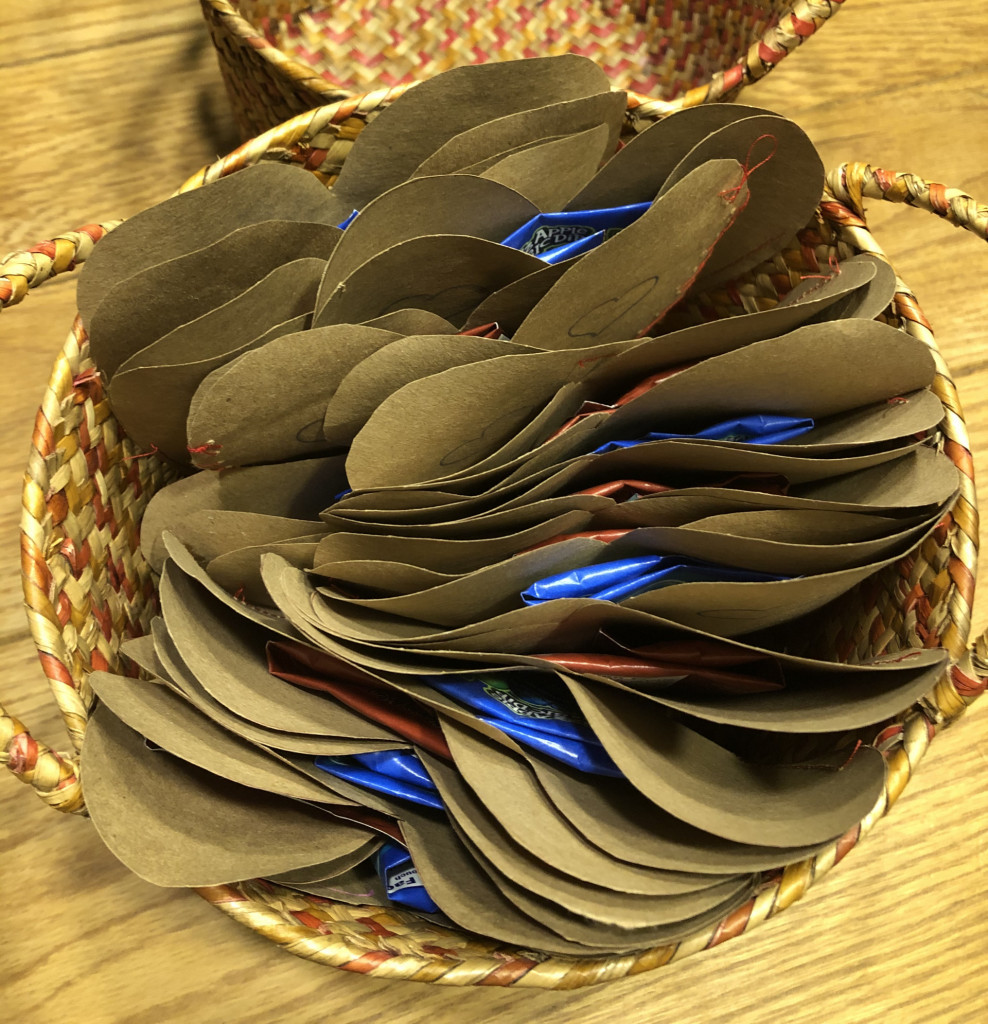
Voila! You’re done! You can make as many of these cute little Valentines as you want, in a myriad of sizes and shapes, depending on your gift giving needs, time available and attention span (especially if you’re doing this craft with little ones)!
Please drop your questions in the comments below. I’m always happy to answer questions!
And comeback to tell me about your experience! I can’t wait to see your beautiful homemade Valentines! If you share photos on Instagram or Facebook, please tag me @carbonfreefamily so I can celebrate your amazing results with you!
]]>
A few years ago, I sewed a bunch of reusable cloth gift bags in cheerful Christmas patterns and they continue to bring me such joy!
I love wrapping presents in these gorgeous bags. I love giving them to people (and am so honored when friends and family want to keep the bag in addition to the gift… in fact, you’ll regularly find me sneaking around and gathering my bags up after gift opening is over at our family gatherings). I love reusing them year after year!
AND they’re super easy to make! I swear, they’re a great project for beginner sewers because it doesn’t matter the size, shape, or even if they’re particularly square. The process is three simple steps: cut, sew, enjoy!
Interested in building more sustainable habits in 2021? Please join my upcoming virtual workshop: Kickstart Your Sustainability Journey!
Step 1: Cut your fabric
If the exact size/shape isn’t important to you, I recommend letting your fabric dictate the size.
For example, my fabric is almost 42 inches wide, so I cut it exactly in half and made two 10 inch wide bags. I cut my fabric 15 inches tall and ended up with two 10”x13” gift bags. I love using printed fabric like this because it makes straight cuts easier. I pick a spot in the pattern and cut right along the “line”.
After cutting, my fabric is about 21 inches wide and 15 inches tall.
Step 2: Cut your cord
I used 1/4” cotton cord, but feel free to use bigger or smaller. Choose the top of your bag (based on the pattern) and cut your cord at least 8-10 inches longer than the width of your fabric (it will hang out 4-5 inches on either end when you’re done).
My fabric is 21 inches wide, so I cut my cord about 31 inches long.
Step 3: Sew your cord into place
Place your fabric with the wrong side up* and the top pointing away from you. Place your cord along the top edge and fold the top of the fabric towards you. You’re going to sew a little pocket for the cord to slide through, so make sure there’s enough fabric that you can run your foot** along the seam without stitching the cord.
* the “wrong side” is what we call the back of your fabric, the side without the pattern, the side you want on the inside of your bag. ** the “foot” is the mechanism around the needle on your sewing machine as shown in this photo.
Step 4: Sew the other two seams
Keeping the wrong side up, fold your fabric in half. This will be the final shape of your bag, so the cord should be at the top and you should have seams to sew across the bottom and one of the sides. Trim any excess fabric if your edges aren’t lining up.
Go ahead and sew these seams. The only tricky part is making sure you don’t sew through the cord/pocket. If you do this, you won’t be able to pull the cord to cinch the bag closed.
Trim extra thread and turn your bag right side out.
Step 5: Tie knots at each end of the cord
This will prevent the cord from accidentally getting pulled into the pocket when someone is opening their gift. Fishing the cord back out is certainly possible, but a royal pain.
You’re done! You can make as many bags as you want, in a myriad of sizes to meet your gift giving needs!
I have about 24 bags total and the “10×13” bag I made today is the “medium” size bag in my collection. I have a bigger size (roughly twice as big) and a smaller size too. Three yards of fabric will yield about 8 medium and 2 large bags. I like to mix and match my colors and patterns, so I’ve purchased different patterns over the years.
Please drop your questions in the comments below. I’m always happy to answer questions!
And comeback to tell me about your experience if you’re making these reusable gift bags for the first time. I can’t wait to hear about your project!
Please join my upcoming workshop… Kickstart Your Sustainability Journey! This 6-week online workshop will change the way you think about sustainability, flipping your mindset so that sustainability becomes a natural part of every decision you make and creating easy sustainable habits. Find more information and register here!